
Not many things keep someone who runs an image site up at night; "a user's original was stolen and we couldn't prove it" is one of them. One afternoon, a photographer on the site came to me, annoyed: "Someone stole my photo. It's on that other site, and they even cropped out my name. I want to file a complaint — you need to give me proof."
I opened the link. Yes, the image was identical, not even a color shift. I said, fine, let's start the process, export your original file from your computer.
He shot back: "Original? They have the original too. How do you prove I uploaded it first?"
I froze.
He was right. Upload time? I had it on record, but the other platform wouldn't accept it. EXIF? Editable in seconds. The original? Everyone has one. I searched my whole system and couldn't produce a single thing that would definitively say: this image was uploaded by a user on my site. In the end it went nowhere. That night I lay in bed feeling awful: I run an image site, and I can't even protect my own images. That's not right.
Later I wired "invisible watermarking" into the upload pipeline, and the problem finally got an answer. Now every image carries a line of text inside it from the moment of upload — "@uploader-username | yuemutuku.com". Invisible to the eye, but at any moment you can extract it and the line floats right back out. Repost it as far as you like — after extraction, I can still find out exactly who uploaded it.
This article is that whole journey from principle to production. I won't write it like a manual; I'll tell it the way I actually stumbled through it.
Back then I knew nothing about blind watermarks. My first instinct was the most primitive trick — slap a semi-transparent logo across the image.

At first I thought it was great: the image carried my domain, and anyone who reposted it carried my ad. Then what happened? The next day I saw the image on another platform — watermark gone. They cropped the corner, or painted it out with a heal tool, clean as a whistle. I tried making the watermark bigger and more central. The image was protected, but the creators exploded first: "Can anyone even look at this?" Fair point. I couldn't look at it either.
Those weeks taught me a lesson: a visible watermark sits in an awkward spot — too small and it gets cropped, too big and it ruins the image. You can't win. The real problem is that a visible watermark and the image content are "two layers of skin" — something stuck on the surface, so people can peel it off whenever they want.
Could we write information directly into the image itself? Let the watermark merge with the pixels, so removing it means destroying the image? That's the right direction — invisible watermarking. But how exactly to "write into pixels", I had no idea at the time. So I started reading, and the deeper I went, the deeper the water got.
Nine out of ten steganography articles on the internet open with LSB — least significant bit.
One sentence of principle: a pixel color is an 8-bit binary number; replace its last bit with the information bit you want to hide.
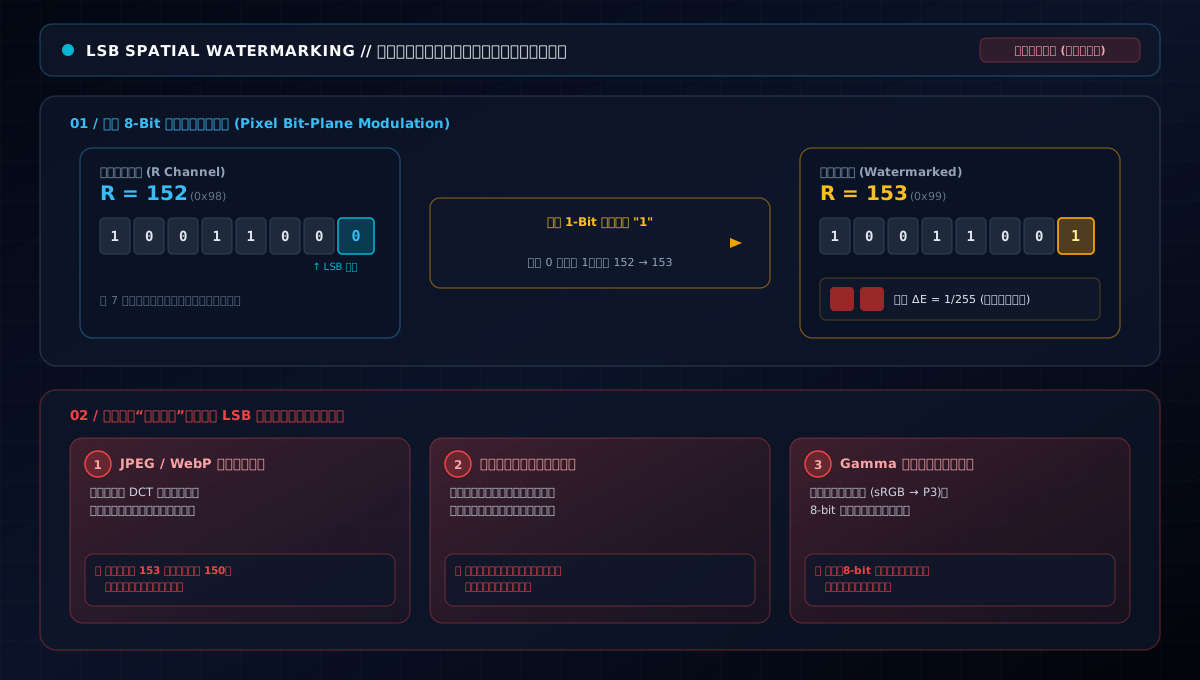
Example: the red channel is 152, binary 10011000. Swap the last 0 for a 1, giving 10011001, which is 153. The difference between 152 and 153 — 1/255 — is imperceptible. A 1000×1000 image has three million pixels and three channels each; theoretically you can hide millions of bits. The capacity is absurd.
Back then I nearly started writing my own LSB library. Luckily I read the rest of that article, and learned just how fragile this thing is:
Any lossy compression kills it. JPEG/WebP recompute pixel values; the LSB is erased without a trace. Geometric transforms misalign everything. After cropping, scaling or rotation, pixels are no longer where they were; extraction can't sync up. Noise resistance is almost zero. A little noise or a brightness tweak flips the LSBs.
And there's a sneakier one: many image pipelines apply gamma correction and color-space conversion, which remaps the 8-bit values and destroys the meaning of the least significant bit. Embed and extract inside your own software, all fine; run the image through any third-party processing pipeline, and it comes out dead.
After reading all that, I got it: LSB belongs in tutorials, not in production code. A watermark that can survive real life needs to hide somewhere else.
It took me days to wrap my head around the frequency domain. In plain words:
Any image can be decomposed into a superposition of "low frequencies" and "high frequencies". Low frequencies are the big stuff — sky, walls, skin transitions. High frequencies are the fine texture — hair strands, brick joints, noise. What JPEG compression does is chop off some high frequencies, because you won't notice.
So the reverse logic: if losing high frequencies doesn't bother your eyes, then stuffing information into high frequencies won't either.
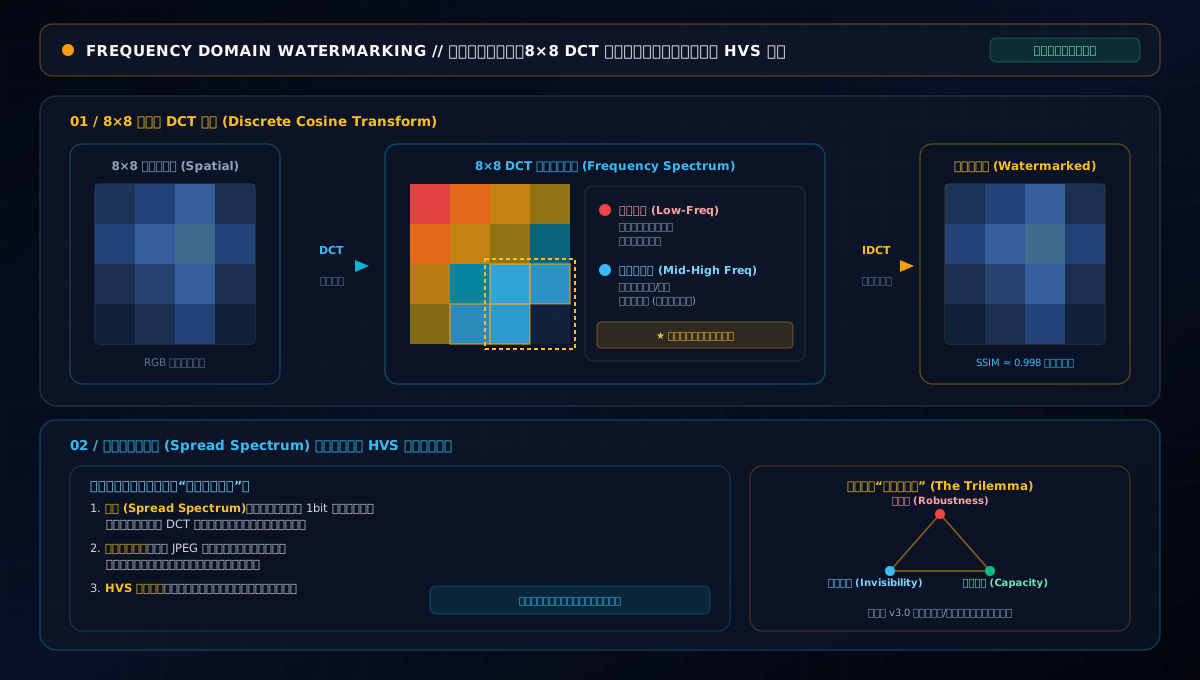
The flow: slice the image into 8×8 blocks, apply DCT (discrete cosine transform) to get a frequency coefficient matrix — low frequencies top-left, high frequencies bottom-right; modulate watermark bits into mid/high-frequency coefficients at agreed positions — e.g. "positive coefficient means 1, negative means 0"; finally apply IDCT to restore the image. Because the changes concentrate in mid/high frequencies, the eye perceives nothing.
But the skeleton is easy; the flesh is hard. The real trap: JPEG compression actively cuts high frequencies. Hide too shallow, and compression wipes it out; hide too deep, and it becomes visible. Cliffs on both sides.
How does industry solve it? Two tricks.
First, spread spectrum. Don't pack one bit into one coefficient. Instead, spread that bit's energy across hundreds of coefficients using a pseudo-random sequence. Compression kills some? Fine — the remaining energy still decodes the bit. This trick was applied to watermarking back in 1993, same ancestry as spread spectrum in communications.
Second, HVS masking — in plain words, "the eye is insensitive to noise in textured regions and hypersensitive in flat regions". So watermark energy goes heavier into textured areas and lighter into flat ones — the same embedding strength becomes nearly invisible while robustness increases.
Together, these two tricks are how the "impossible triangle" — robustness, imperceptibility, capacity; pick any two — gets squeezed to a workable balance. Commercial solutions (including the Tencent Cloud Data Processing we're about to use) all do this.
The theory made sense, but writing DCT plus spread spectrum plus masking models from scratch myself? I looked at my remaining hair and decided to check whether a wheel already existed.
Our images were already on Tencent Cloud COS. A quick search showed the Data Processing (CI) service ships a built-in blind watermark — plain REST API, no need to write DCT myself. The text blind watermark v3.0 we needed looks like this:
watermark/3/type/3/text/<Base64>/version/3.0
type/3 is text blind watermark; text is URL-safe Base64 (no padding) of the text; version/3.0 is the algorithm version — much stronger against compression, cropping, scaling and rotation than older versions. Extraction uses watermark/4/type/3/version/3.0.
Integration came in three steps: embed-on-upload, batch backfill of legacy images, and theft extraction. I expected three days. The pitfalls had other plans.
The upload pipeline was written in Java + COS SDK. The core idea: use COS's PicOperations to compress and embed the blind watermark in a single upload.
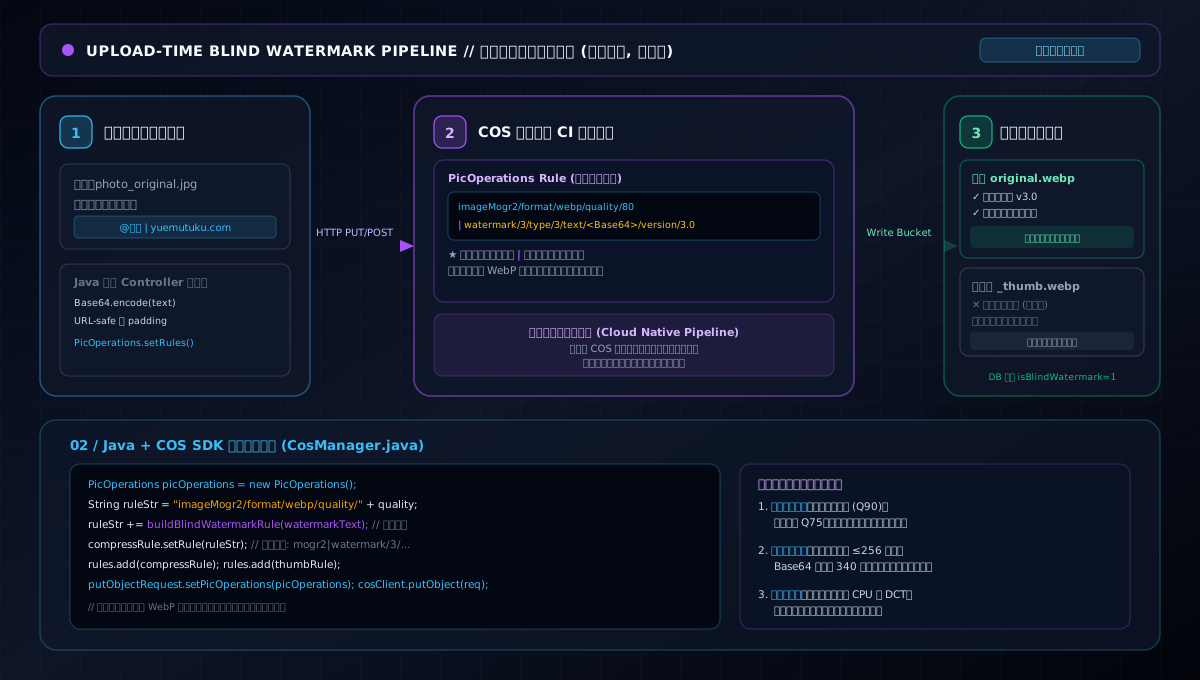
The key code (simplified):
// CosManager.putPictureObject(key, file, watermarkText)
PicOperations picOperations = new PicOperations();
picOperations.setIsPicInfo(1);
List<PicOperations.Rule> rules = new ArrayList<>();

// 1. Compress to WebP + blind watermark, joined by pipe into one rule
PicOperations.Rule compressRule = new PicOperations.Rule();
compressRule.setFileId(webpKey);
String ruleStr = String.format("imageMogr2/format/webp/quality/%d", quality);
ruleStr += buildBlindWatermarkRule(watermarkText);
compressRule.setRule(ruleStr);
rules.add(compressRule);

// 2. Thumbnail (no watermark, scale only)
PicOperations.Rule thumbRule = new PicOperations.Rule();
thumbRule.setRule(String.format(
    "imageMogr2/thumbnail/%sx%s>/format/webp/quality/%d", 1024, 1024, quality));
rules.add(thumbRule);

picOperations.setRules(rules);
putObjectRequest.setPicOperations(picOperations);
cosClient.putObject(putObjectRequest);
Where does the watermark text come from? Join the currently-logged-in user at upload:
String watermarkText = "@" + user.getUserName() + " | yuemutuku.com";
And here's the satisfying part of the design: every image carries its uploader's identity. Zhang San's images hide "@ZhangSan | yuemutuku.com"; Li Si's hide "@LiSi". When someone's image gets reposted, extract it and you know exactly which account uploaded it — traceability is per-user, not per-site. Every user now has an invisible personal signature.
A few details we weighed repeatedly:
Thumbnails deliberately have no watermark. The list and detail pages lean on thumbnails for speed and clean looks, and a cropped thumbnail makes the watermark moot. The watermark goes into originals (original.webp) only.
Quality is graded by file size. The pipeline has a getQualityForFileSize — small images get high quality (their detail can't survive harsh compression), large images trade a little quality for size. An easily missed point: the lower the quality, the harsher the compression, and the stronger the watermark signal needs to be — so quality grading and watermark robustness are tuned together, not "just fill in 80".
Embedding happens server-side on COS. Data Processing does it in its processing pipeline; the backend Java only assembles rules into the upload request, so embedding adds almost no upload latency — which is exactly why we could afford to add it to every single upload.
Step 1 went smoothly. I was feeling smug. Then step 2 slapped me in the face.
Oh wait — one more thing nearly overturned step 1 first. Before enabling embed-on-upload for everyone, I ran a week-long gray rollout on staging: every day, randomly pick a few watermarked images and extract, watching the success rate. In the first two days I found something bizarre — the same image extracted fine in the morning and failed in the afternoon. After hours of digging: the staging machine's clock was two minutes slow, COS signatures expired, and every extraction request got bounced with 403. Who would have guessed watermark extraction depends on NTP? I hardened production clock sync right after. You never see these traps coming until you step on them.
What about the old images from before the feature? Hundreds of thousands of them. No way to do it by hand. I wrote a background job to backfill them in batches.
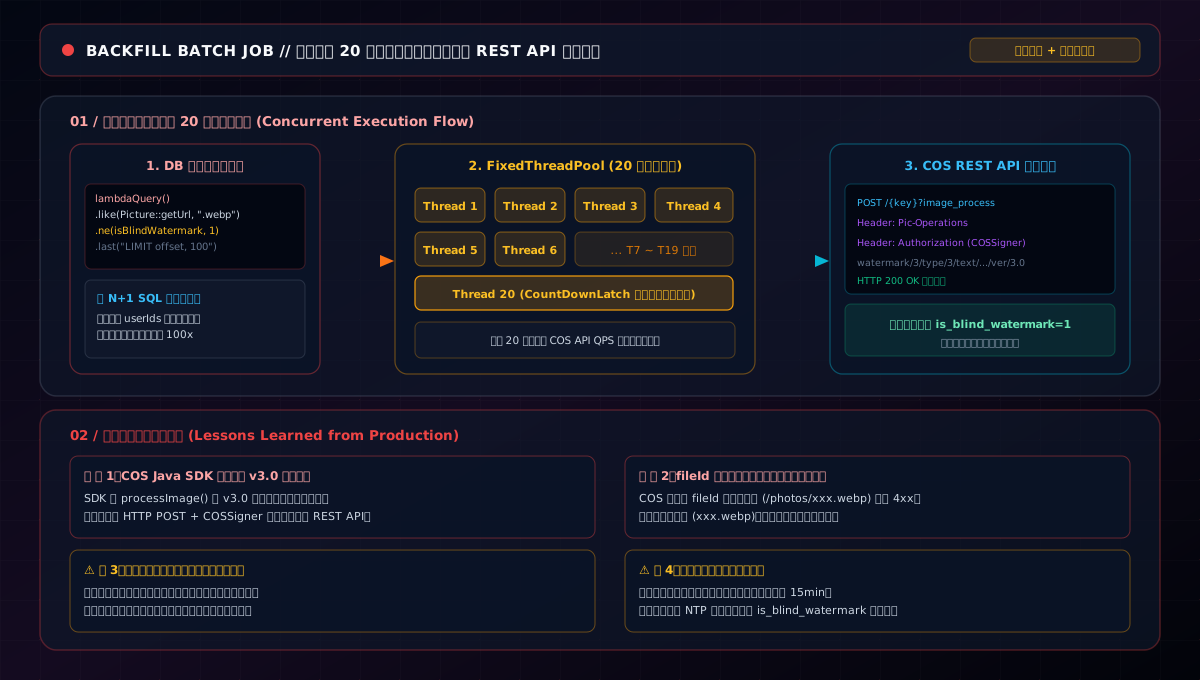
The idea: scan for "url contains .webp AND not yet marked processed", batch-fetch usernames (avoid N+1), embed with 20 concurrent threads, then set is_blind_watermark to 1 on success.
// Scan: pending = url contains .webp AND not yet marked
List<Picture> pics = this.lambdaQuery()
        .likeRight(Picture::getUrl, "http")
        .like(Picture::getUrl, ".webp")
        .ne(Picture::getIsBlindWatermark, 1)   // key field for resume
        .last("LIMIT " + offset + "," + batchSize)
        .list();

// Embed with 20 threads
ExecutorService executor = Executors.newFixedThreadPool(concurrency);
CountDownLatch latch = new CountDownLatch(pics.size());
for (Picture pic : pics) {
    executor.submit(() -> {
        cosManager.embedBlindWatermark(key, watermarkText, quality);
        // mark is_blind_watermark=1 on success
    });
}
latch.await();
The first pitfall hit fast and hard: the COS Java SDK has incomplete blind-watermark v3.0 support. The SDK's processImage doesn't fail — it silently fails. Parameters get swallowed, it reports success, and the watermark never lands. Debugging that, I was dazed: every test said "success", extraction found nothing.
In the end I bypassed the SDK entirely, hand-signing REST API calls with COSSigner. More verbose, fully controllable. That lesson stuck: the word "support" in an SDK deserves a question mark, especially for new features.
Pitfall two hides in the parameters: fileId accepts only the filename, no directory prefix. Object keys almost always carry directories (/photos/2026/xxx.webp), but the embed/extract fileid only recognizes the bare filename (xxx.webp) — a prefix returns 4xx. Not clearly documented; we found it by trial and error from error messages.
Pitfall three is about rule assembly: during backfill, don't pipe-join the watermark rule with compression. Pipe-joining in one rule works fine for new uploads (that's how step 1 does it), but during legacy backfill the piped combo proved unreliable. Fix: in backfill, watermark and format conversion run as two independent rules — ensure the watermark lands first, format second.
Pitfall four involves signatures: signatures expire in 15 minutes. REST calls need hand-computed COS signatures (COSSigner.buildAuthorizationStr), validity 900 seconds. Long-running batch jobs are fine — signatures are computed per request, not shared. But server clocks must be accurate; drift invalidates signatures instantly, and you get a wall of 403s.
One more pitfall I only found after the run: the job needs observability, not a black box. The first version logged only start and end; during the run I had zero idea where it was, how many succeeded, how many failed. Later I added three observation points: per-batch "this batch success/failure/cumulative success"; failure counter plus the first few failure reasons (mostly timeouts and rate limits); and a summary written to logs at the end. With those, the job went from "gambling" to "reviewable". Any batch job without progress and failure stats is running naked.
And a design detail worth mentioning: the is_blind_watermark field is not just a flag — it's the lifeline for resumable runs. Each image is marked 1 on success; the next scan skips it. If a run crashes or times out, re-running only handles the remainder — no double-embedding (double embedding adds noise and degrades extraction, more on that later).
A reposted image found? Extract it. The admin endpoint:
@GetMapping("/admin/extractWatermark")
public BaseResponse<Map<String, Object>> extractWatermark(@RequestParam long pictureId) {
    // Build extraction rule: watermark/4/type/3/version/3.0
    String rule = "{\"is_pic_info\":1,\"rules\":[{\"fileid\":\"xxx.webp\","
        + "\"rule\":\"watermark/4/type/3/version/3.0\"}]}";
    String xml = cosManager.extractBlindWatermarkXml(key, watermarkText);
    // Parse XML → Text / WatermarkStatusCode
    // → "Extraction OK, watermark: @ZhangSan | yuemutuku.com"
}
The first time extraction actually worked, I nearly shouted at my desk. That stolen image — downloaded from the other platform, thrown into the extraction endpoint untouched — returned a line of text seconds later: "@someone | yuemutuku.com". Exactly the username of the user who uploaded it.
Don't celebrate too early, though. Extraction fails sometimes too. One time ops brought in an image that had been reposted several hands deep; the WatermarkStatusCode came back "extraction failed". After digging, that image had been repeatedly transcoded and filtered on its journey; the watermark signal had degraded past detection. We eventually figured out a rule: the shorter the repost chain and the closer to the original, the higher the success rate; at "screenshot + filter + crop-recompose" levels of damage, nobody can save it. So ops learned: when there's a dispute, hunt for the highest-quality version, don't test with the most-compressed copy.
At that moment I understood why Wikipedia's classic lifecycle diagram exists — embed, attack, detect, a closed loop. Watermarking is inherently designed for adversarial conditions:
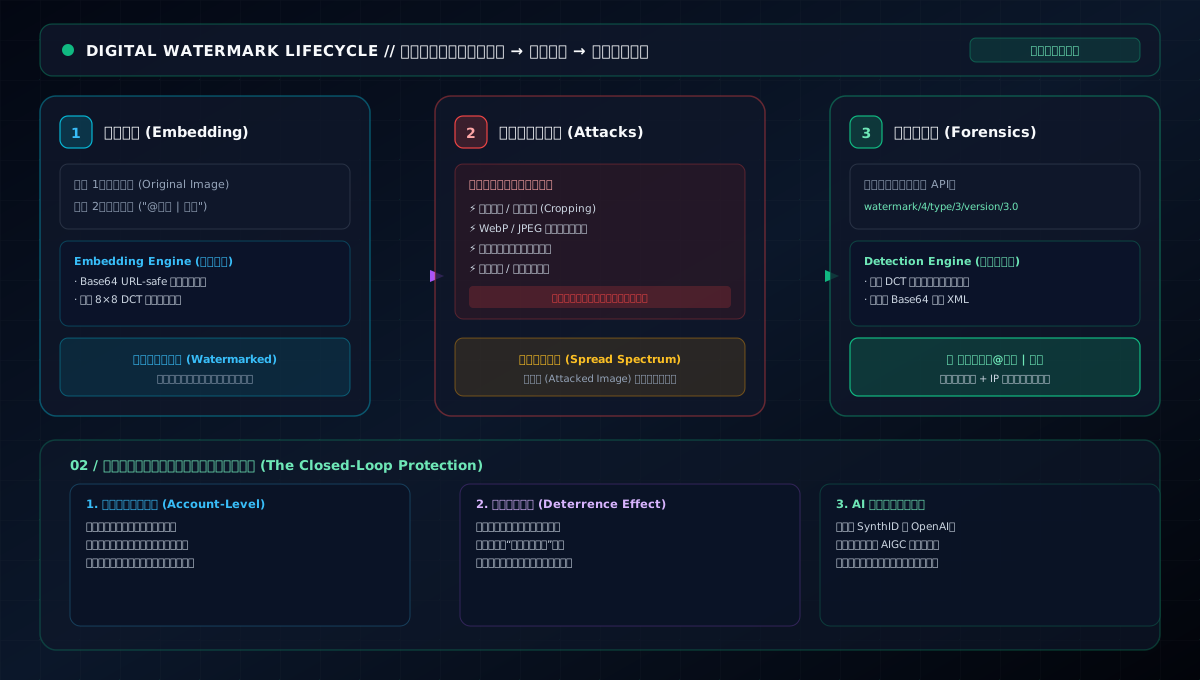
(Image from Wikimedia Commons, CC BY-SA 4.0)
Double embedding corrupts the watermark. Embedding twice modulates the same signal twice; extraction can return garbage. So the is_blind_watermark field must be accurate — it's what stops reruns from double-processing. That's why I called it the lifeline.
Extraction wants the cleanest copy available. CI blind watermark survives JPEG/WebP compression and moderate cropping/scaling, but heavy re-processing (repeated transcoding, mosaic, repainting, huge filters) degrades it past extractability. In a real dispute, hunt for the highest-quality reposted version first; the success rate jumps.
Numbers worth showing: the upload path is zero-perception — embedding happens inside COS, users feel nothing; hundreds of thousands of legacy images, 20 threads, done in a few job runs; and when a real dispute happens, the extracted "@username | domain" plus upload time and IP records form a complete chain of evidence that visible watermarks could never give.
An unexpected side benefit showed up: deterrence. Reposters don't know the watermark is there, but the platform does. After one case where a reposter was publicly identified with precision, the reposting culture in the community visibly cooled down. Often, making thieves know "you can be traced" works better than actually tracing them.
Speaking of that "identification" — it was quite dramatic. A user had been reposting several photographers' work in a row. The photographers, fed up, threw screenshots, originals, and timelines in front of me. One by one I extracted; every image clearly showed the reposting account's own username — because he was logged in when he uploaded the stolen images, and carried his own watermark into them.
The evidence chain was so complete he couldn't even argue. After that, the account deleted itself, and reposting posts visibly dropped. The after-effect was bigger than I expected — a watermark's power often comes from "it might be there".
I should also say the honest limits, so you don't treat it as a silver bullet:
It's not an anti-leech silver bullet. It solves "trace afterwards", not "prevent beforehand". Real protection still needs anti-leech headers, compressed delivery, download restrictions and the like. Resistance to heavy re-creation is limited. Screenshot + heavy filter + crop-recompose may break extraction. Fortunately, reposters rarely bother; ordinary reposting (save/crop) survives fine. Compliance matters. Embedding identity into user images touches user awareness — our terms state "the platform may add digital watermarks to uploaded content for copyright protection."
And a bit of industry gossip. Google's SynthID and OpenAI's AI-content watermarking are, at heart, the same thing — embedding invisible watermarks into generated content, just with the payload changed from "who uploaded this" to "this was made by AI". The technical route is identical to our image traceability — robust modulation in the frequency/transform domain. Invisible watermarking has moved from "a small tool for copyright forensics" to "part of the content-trust infrastructure". If you don't adopt it now, the day regulation demands "AI content must be marked", you'll still have to. Early adoption compounds.
If you build an image or video product, my advice is one sentence: treat blind watermarking as infrastructure, not as a retrofit. The upload moment is the perfect time to embed — once images flow out, you can only chase them with backfill jobs, costing more while every image from the gap period runs naked.
The code in this article comes from the real production environment of Yuemutuku (yuemutuku.com). If you're wading through the same muddy water, the comments are open — especially on extraction success-rate tuning and backfill job design, the two areas where I stepped on the most mines. And feel free to upload an image to the site and feel what it's like to have "every image carry an identity" — your photos now have a signature that isn't easy to erase.