
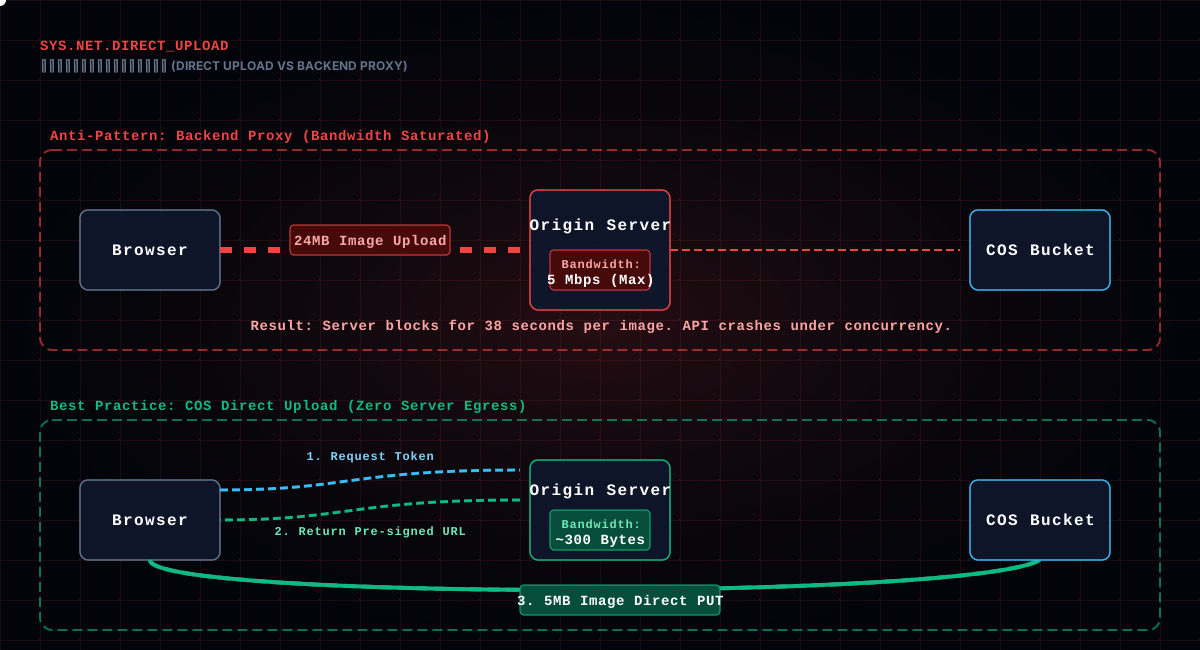
The first day I designed this project's upload pipeline, I was staring at an arithmetic problem: the server had 5 Mbps of outbound bandwidth, and a user's 24 MB photo, sent the naive way — browser to server to object storage — would saturate that egress for thirty-eight seconds. Ten users uploading at once and the server turns into a slideshow; every other endpoint goes down with it, and even your own admin dashboard crawls.
So from day one, this project's upload path skipped the naive route:
Browser compression → backend signs a credential → client uploads directly to COS → backend confirms and processes
The backend barely touches the image file itself. It does exactly two things: issue a 30-second "pass," then run the cleanup processing after the image lands in object storage. This article walks every step of that pipeline, from picking a file to writing the database record. The code is what actually runs in production — I'm keeping it close to the original, not a sanitized "teaching" version.
Remember four actions — each later section unpacks one of them:
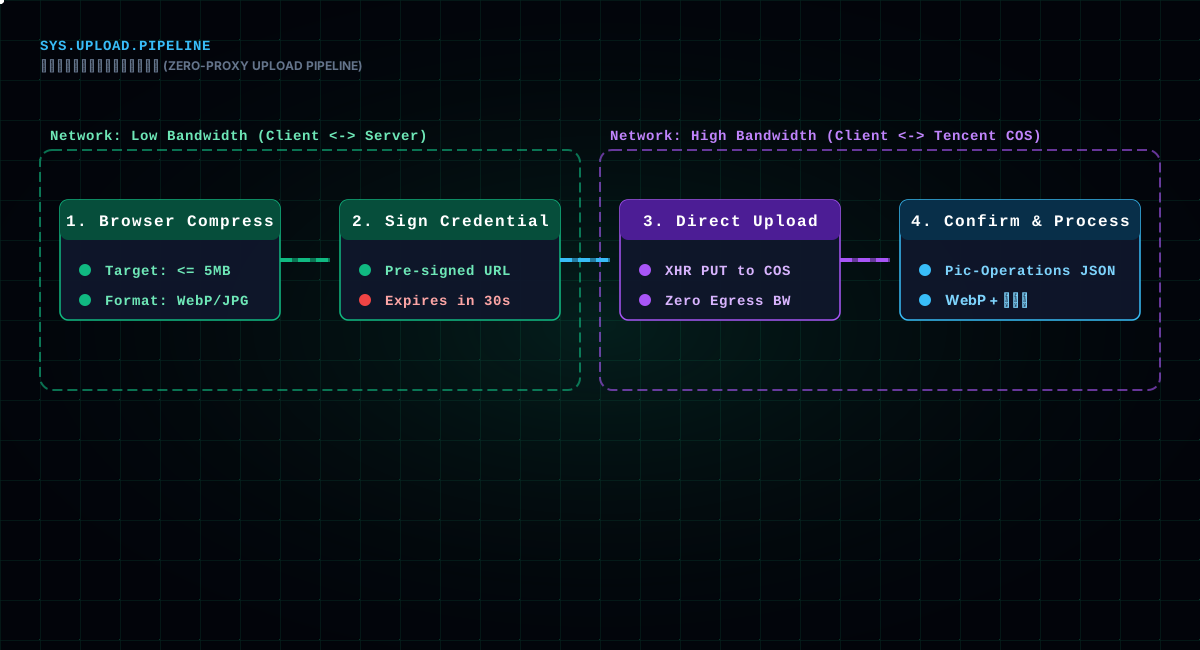
The whole pipeline boils down to just two endpoints, which look like this in the API docs:
POST /picture/upload/token
  request: { fileName, fileSize, spaceId, pictureId, isPost }
  response: { cosKey, presignedUrl, expireTime }   // valid for 30s

POST /picture/upload/confirm
  request: { cosKey, pictureId, picName, tagName, categoryName, spaceId,
             introduction, picSize, picWidth, picHeight, picScale,
             picFormat, picColor, thumbnailKey, isPost }
  response: PictureVO   // the full image record after insert
The frontend does two things: ask for a credential, and shout "confirm" when the upload is done. The heaviest part of the transfer happens directly between the browser and COS.
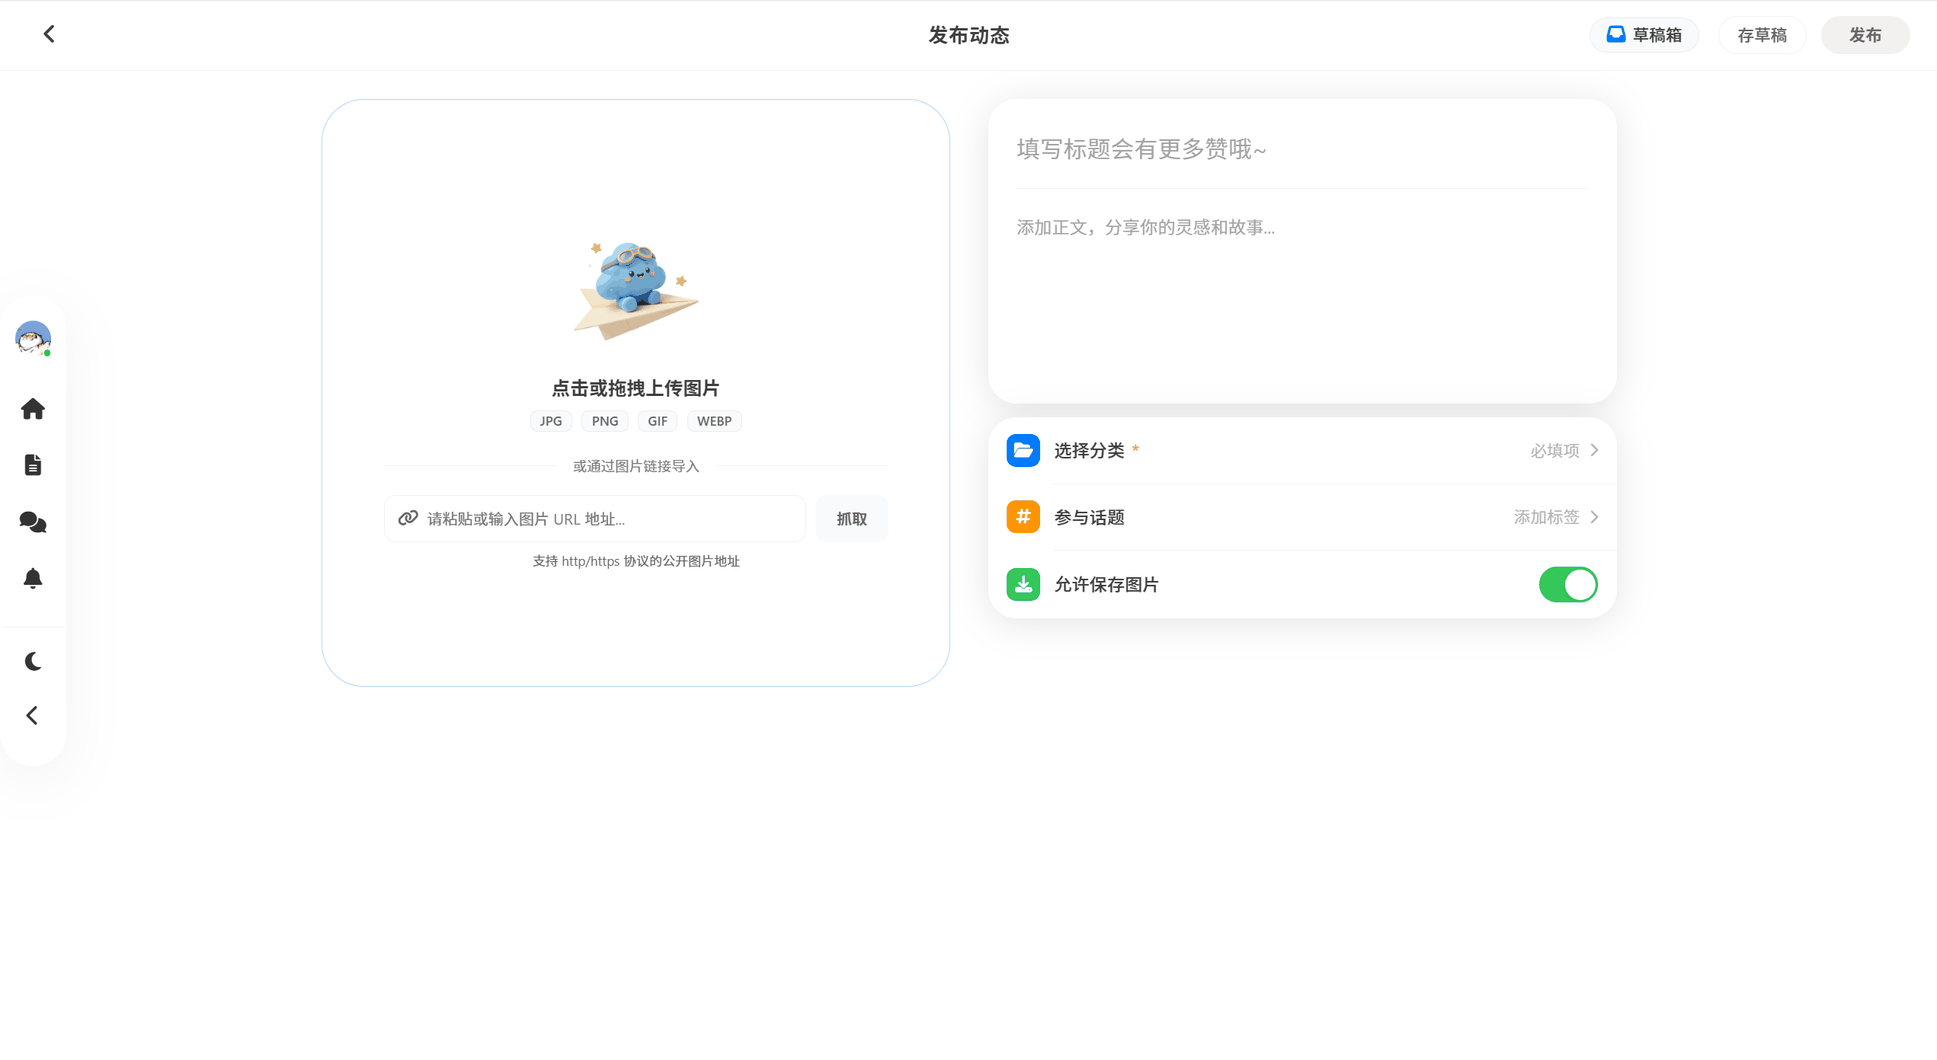 ▲ Fig: The frontend upload page (AddPicturePage / PictureUpload, with compression and the global upload progress pill)
Why insist on direct upload instead of proxying through the backend? Two words: bandwidth. Object storage's egress is carried by the cloud provider; your server's bandwidth is bought with real money and can't take it. Large files like images burn money and performance every time they pass through your server. After direct upload, the server only handles a few hundred bytes of JSON. The math works out every time.
Of course, direct upload isn't a silver bullet. For small files, for cases where the server must touch the file first, or if you can't afford object storage at all, backend proxying is still a reasonable choice. What direct upload buys you in bandwidth and latency, it costs you in "the file passes through us first" — meaning you can't do any server-side checks before it's stored. So this architecture choice is fundamentally a trade-off: save the bandwidth, push the checks later. As you'll see later in this article, the sensitive-word filter and image processing all happen after confirm.
compressorjs and browser-image-compression are both sitting in package.json, but the main upload path uses compressImage, which we wrote ourselves in src/utils/uploadUtil.ts. Why? Because what we need is "compress to under a specific size," not "compress to some quality." Those are completely different goals — a library hands you a quality parameter and makes you guess; we want one sentence: "give me ≤5MB."
Here's the skeleton. Small files pass through untouched; big files get worked on:
const MAX_COMPRESSED_SIZE = 5 * 1024 * 1024
const MAX_WIDTH = 2560
const MAX_HEIGHT = 1440

export async function compressImage(file, maxBytes = MAX_COMPRESSED_SIZE) {
  // already small enough, return as-is
  if (file.size <= maxBytes) return file

  const supportsWebP = await checkWebPSupport()
  const targetFormat = supportsWebP ? 'image/webp' : 'image/jpeg'
  const targetQuality = targetFormat === 'image/webp' ? 0.85 : 0.92
  // ... FileReader → Image → canvas
}
One detail worth calling out: WebP support is probed at runtime, not hard-coded. checkWebPSupport() feeds a base64 1×1 WebP image to new Image(); if it decodes, the browser supports WebP, and we use WebP at 0.85 quality. Otherwise we fall back to JPEG at 0.92. Why bother? WebP is roughly 30% smaller at the same perceived quality, but old Safari doesn't support it — better to give up a little size than to upload a broken image.
The real centerpiece is the second step — scale by volume ratio first, then binary-search the quality:
// rough pass: scale by sqrt of the size ratio
const scale = Math.min(1, Math.sqrt(maxBytes / file.size))
let w = Math.round(img.width * scale)
let h = Math.round(img.height * scale)

// then clamp to max dimensions
if (w > MAX_WIDTH || h > MAX_HEIGHT) {
  if (aspect > 1) { w = Math.min(w, MAX_WIDTH); h = Math.round(w / aspect) }
  else { h = Math.min(h, MAX_HEIGHT); w = Math.round(h * aspect) }
}

// binary search quality in [0.5, targetQuality] with repeated toBlob
const compress = (min, max, attempt) => {
  if (attempt > 8 || max - min < 0.01) {
    canvas.toBlob(b => b ? resolve(b) : reject(), targetFormat, min)
    return
  }
  const mid = (min + max) / 2
  canvas.toBlob(b => {
    if (!b) return reject()
    if (Math.abs(b.size - maxBytes) < maxBytes * 0.05) resolve(b)   // good enough
    else if (b.size > maxBytes) compress(min, mid, attempt + 1)      // too big, go lower
    else compress(mid, max, attempt + 1)                             // too small, go higher
  }, targetFormat, mid)
}
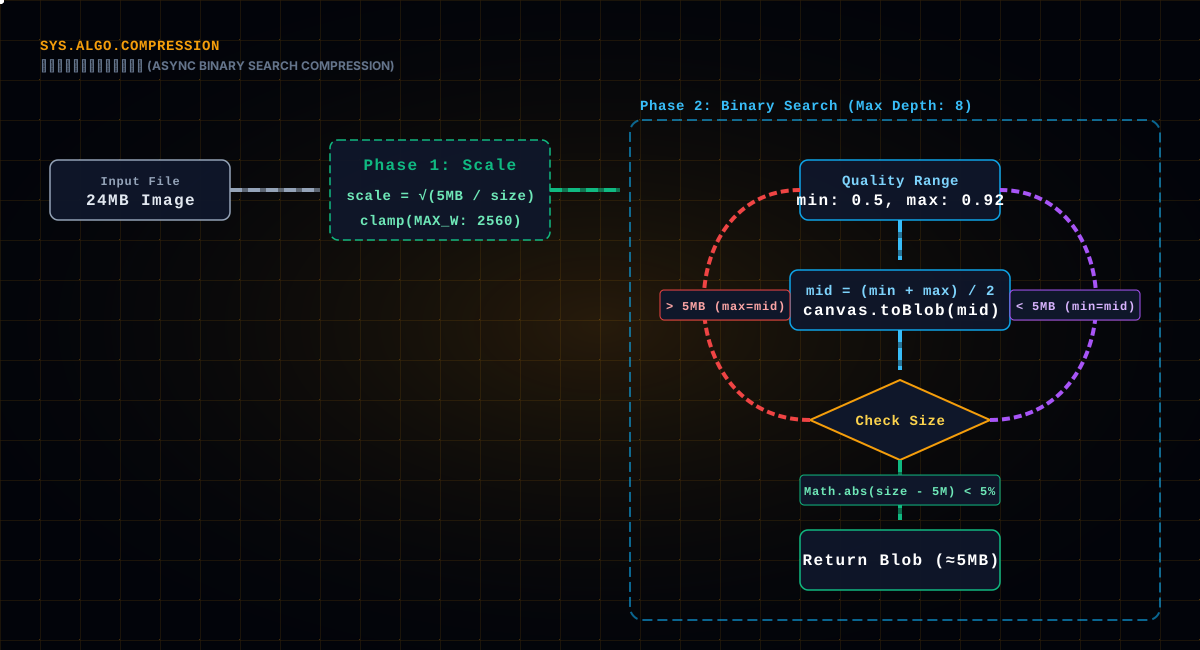
This binary search is fun. canvas.toBlob isn't synchronous, so this is really an "async binary search": each time take the midpoint of the quality range, toBlob at that quality, see how far the size is from the 5MB target — bigger means cut the quality range down, smaller means push it back up, at most eight recursions. It converges because within the same canvas and format, quality and output size are basically monotonic — higher quality, bigger file; lower quality, smaller. That monotonicity is the premise the binary search stands on.
I've seen plenty of people use a fixed "quality=0.8" one-size-fits-all, and a 24MB image still comes out at 12MB, or a 500KB image gets crushed to mush. The beauty of the binary search is that it doesn't look at the original size, only the target size — whether a 3MB or a 24MB file comes in, the output lands on the 5MB line.
One sneaky line: when converting to JPEG we first ctx.fillStyle = '#FFFFFF'; ctx.fillRect(...) to fill the background white. Because JPEG has no alpha, without that fill, transparent PNG regions turn into black blocks. It looks trivial, but miss it and a pile of images with alpha channels suddenly turn ugly.
So the frontend squeezes once, and the backend squeezes again on COS (Part 5). Two gates, each doing its own job: the frontend keeps big files off the wire, COS decides the final stored form.
Two more caps worth mentioning: MAX_WIDTH=2560, MAX_HEIGHT=1440. Why these numbers? 2560 is about the width of many 2K screens; beyond that, perceived quality barely changes but the size grows fast. The 1440 height leaves room for tall images. This trade-off sits on top of the "viewing scenario" — the list page needs thumbnails that are clear, the detail page needs big images that aren't blurry, and both are covered without going 4K.
The project actually has a second compressor in the project, used for chat, scan-to-search, batch, and other scenarios. It goes a different route: fixed quality starting at 0.85, stepping down one notch at a time until the size fits or the quality drops below 0.5. The contrast is interesting: step-down is simpler to implement but may compress several times before hitting the target, wasteful for images that aren't big to begin with; binary search converges faster, but depends on the quality-to-size monotonicity, which basically holds for canvas toBlob. So the main upload uses binary search, auxiliary scenarios use step-down — each to its own taste.
The file is compressed; the frontend asks for a credential with POST /picture/upload/token, reporting the file name and size. The backend runs a round of validation first, then generates the COS key and the pre-signed URL.
The validation has a pile of details worth going through. The max file size is 20MB — note this cap is on the original file; the frontend's 5MB is the "on-the-wire" target, while the backend's 20MB is the "don't bypass me" floor. If you skip the frontend and call the API directly with a 200MB file, the backend rejects it. The format whitelist is jpg/jpeg/png/webp plus a bunch of audio formats — yes, this upload channel isn't just for images; audio goes through the same credential system.
Then the cosKey is generated. The key's path rules directly decide how files are organized in COS, and they're also the embryo of permissions:
String prefix;
if (spaceId != null && spaceId > 0) {
    prefix = String.format("space/%s", spaceId);          // user space
} else if ((spaceId != null && spaceId == -1L) || (isPost != null && isPost)) {
    prefix = String.format("post/%s", loginUser.getId()); // post/chat images
} else {
    prefix = String.format("public/%s", loginUser.getId()); // public images
}
String uuid = RandomUtil.randomString(16);
String date = cn.hutool.core.date.DateUtil.formatDate(new java.util.Date());
String cosKey = String.format("%s/%s_%s.%s", prefix, date, uuid, ext);
The three prefixes space/{id}, post/{userId}, public/{userId} encode "who uploaded it and what kind of content" into the path itself. date + 16 random chars makes collisions nearly impossible and naturally groups files by day, which helps later with lifecycle management and cleanup.
Then the 30-second "pass" — the pre-signed PUT URL:
public String generatePresignedPutUrl(String key, int expireSeconds) {
    java.util.Date expiration = new java.util.Date(System.currentTimeMillis() + expireSeconds * 1000L);
    GeneratePresignedUrlRequest req = new GeneratePresignedUrlRequest(bucket, key, HttpMethodName.PUT);
    req.setExpiration(expiration);
    return cosClient.generatePresignedUrl(req).toString();
}
What is a pre-signed URL? Plainly: "put the signature into the URL." COS normally authenticates via an Authorization header. The backend holds the SecretKey, signs "method + path + expiry" into a string and appends it to the URL; the frontend can PUT directly with that URL, knowing neither the SecretKey nor the SecretId. It expires in 30 seconds.
The logic here: the SecretKey never leaves the backend, and the frontend only ever holds a credential that is "limited in time, limited to one object, limited to one action." Even if someone steals the pre-signed URL, it dies on its own in 30 seconds and can only PUT that one key. That's the standard posture for object-storage direct upload — a whole order of magnitude safer than stuffing the SecretId/SecretKey into frontend config.
Why 30 seconds instead of ten minutes? Because this credential is "one direct-upload allowance": its entire value is one PUT to one key within 30 seconds. The credential itself is free to issue; the money burns at the direct-upload step. So keeping the credential short-lived is purely about shrinking the exploitable window if it's intercepted. Combined with the rate limiting in Part 6, you get belt and suspenders: credentials as short-lived as possible, endpoints as throttled as possible.
 ▲ Fig: The Tencent Cloud COS bucket console — files organized under public/, space/, post/ prefixes
With the credential in hand, the frontend starts the direct upload. I made a counter-intuitive choice here: we didn't pull in Tencent's cos-js-sdk-v5, and wrote the PUT by hand with XMLHttpRequest instead. The reason is plain — a pre-signed URL is essentially a signed PUT address, and sending a PUT from the browser is a few lines of code. Why pull in a multi-thousand-line SDK for one PUT?
const xhr = new XMLHttpRequest()
xhr.open('PUT', presignedUrl)
xhr.setRequestHeader('Content-Type', uploadFile.type || 'image/jpeg')
xhr.upload.onprogress = (e) => {
  if (e.lengthComputable) {
    const percent = Math.round((e.loaded * 100) / e.total)
    updateProgress(percent)
  }
}
xhr.onload = () =>
  (xhr.status >= 200 && xhr.status < 300)
    ? resolve()
    : reject(new Error('COS ' + xhr.status))
xhr.onerror = () => reject(new Error('COS upload failed'))
xhr.send(uploadFile)
This xhr.upload.onprogress is the only place in the whole pipeline that gets real upload progress. It's not simulated — it's the byte count reported by the browser.
Where does the progress go? Into a global singleton, useUploadProgress. It's a module-level variable shared across the whole site; whatever triggers an upload drives the "upload pill" at the top level of App.vue — a small component floating in the corner of the page, with a state machine of idle → uploading → confirming → done / error. Upload five images, have AI generate images, whatever — any upload action wakes the same pill. A hidden benefit of this design: if the user switches to another page mid-upload, the progress bar is still there — because the state lives in the module, not in some component's local data.
Another class of error that's especially hard to debug here: the pre-signed URL expiring into a 403. When the frontend's PUT gets a 403, the right move is to redo the "get credential → PUT" round, not to fail and make the user re-pick the file — the file is already compressed; retrying only needs a fresh credential. We later added "auto-refetch the credential once on failure," and the user-visible rate of these occasional 403s dropped to near zero. The lesson: for flaky network-layer errors, auto-retry instead of dumping them on the user.
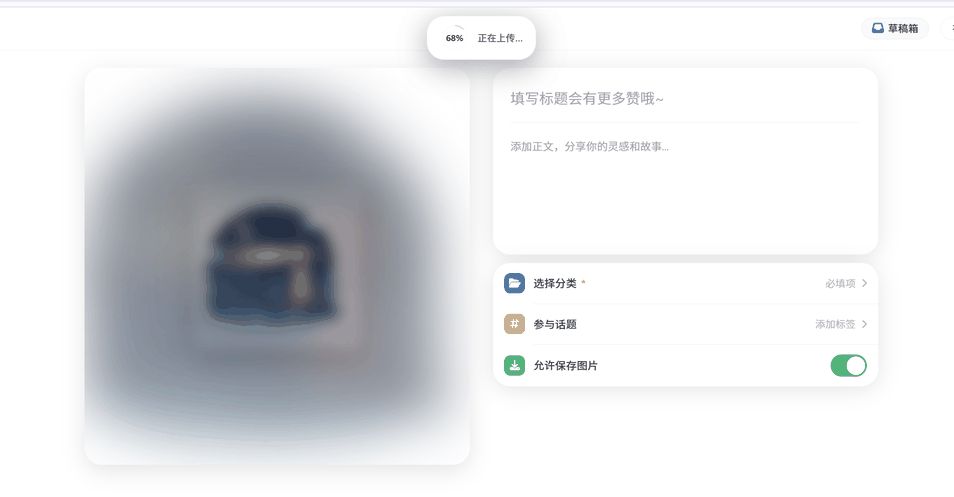 ▲ Fig: The site-wide upload progress pill — uploading / confirming / done / failed
Once the direct upload completes, the frontend immediately calls POST /picture/upload/confirm, handing back the cosKey. Note the order: confirm only after the PUT succeeds — confirm is the "I'm done, backend, take over and process" signal.
Now the backend actually "takes over." confirmUpload has a branch: if the request carries AI-generated metadata (both width and height present, hasAiMeta), the image was generated directly by the AI service and already processed elsewhere, so the backend skips image processing entirely and saves a COS processing fee. Otherwise it goes the normal route.
Let me unpack that branch — AI-generated images take a cheaper path: the AI service already processes the image and carries its metadata at generation time, so confirm passes width, height, ratio, and the thumbnail key straight through, and the backend doesn't even call COS processing — it just writes the record. Why not run everything through COS processing? Because AI images are machine-generated: dimensions and quality are controlled, and running them through WebP conversion and thumbnailing again is pure waste of COS processing fees. A branch that looks like a few lines is really the "save where you can" ops philosophy landing in code.
At the top of confirm there are two easy-to-miss checks: one validates the target space still has capacity and rejects if it's full; the other handles "re-upload to replace" — when a pictureId comes in, the old picture's space must match, so a user can't replace into someone else's space. These checks look trivial, but they're exactly what drags the "direct upload" flow — which looks unmanaged — back onto the rails of permissions.
The normal path is the most interesting stretch of the whole chain, and it's one call:
String watermarkText = "@" + loginUser.getUserName() + " | yuemutuku.com";
String xml = cosManager.processUploadedImage(req.getCosKey(), watermarkText,
        cosManager.getQualityForFileSize(1024 * 1024));
cosResult = CosManager.parseImageProcessResult(xml);
Behind that one line, COS does three things: convert to WebP, embed a blind watermark, produce a thumbnail. It relies on COS's "persistent image processing" — you POST an object with a Pic-Operations rule JSON, and COS writes the products back to the same bucket. The rule looks like this:
{
  "is_pic_info": 1,
  "rules": [
    { "fileid": "xxx.webp",
      "rule": "imageMogr2/format/webp/quality/90|watermark/3/type/3/text/{base64}/version/3.0" },
    { "fileid": "xxx_thumbnail.webp",
      "rule": "imageMogr2/thumbnail/1024x1024>/format/webp/quality/90" }
  ]
}
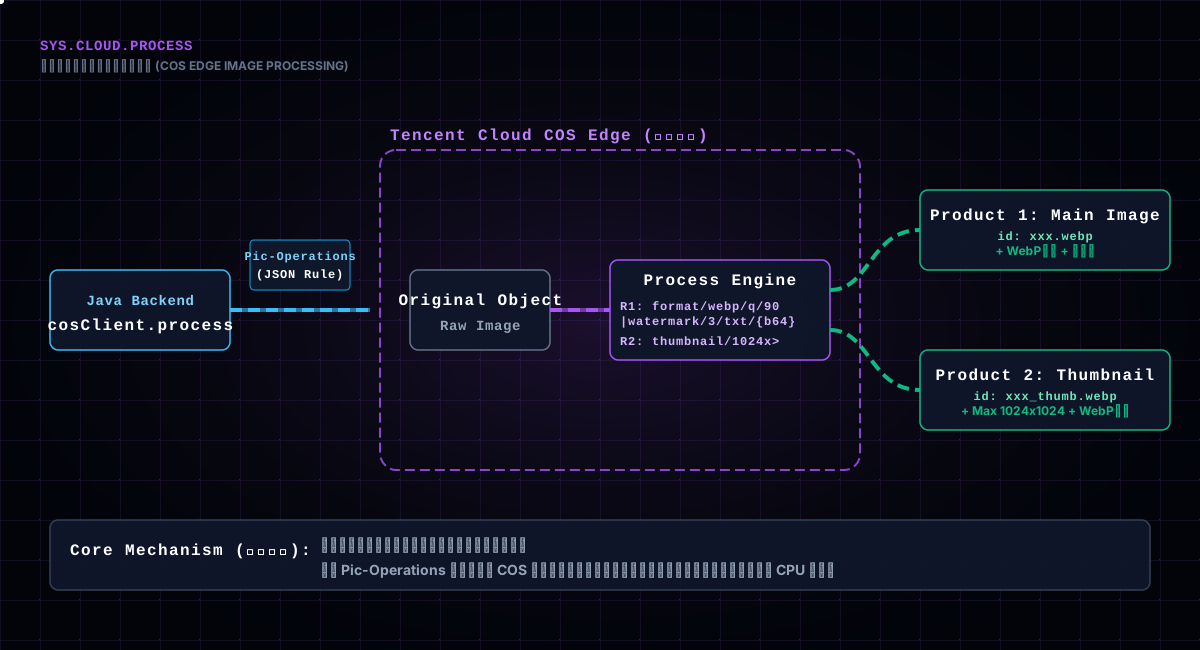
The first rule converts the original to WebP at the given quality, chaining a blind-watermark rule after it with a pipe |; the second produces a thumbnail under 1024×1024 without a watermark. One request, two products — that's the power of "don't download the image back to your server to process it" — the processing runs in the cloud, and your server never so much as looks at the pixels.
The blind watermark is the hidden star of this section. A blind watermark is one humans can't see but programs can extract; COS supports text blind watermarks v3.0. The text in the rule is the base64-encoded watermark text:
String base64 = Base64.getUrlEncoder().withoutPadding()
        .encodeToString(watermarkText.getBytes(StandardCharsets.UTF_8));
return String.format("|watermark/3/type/3/text/%s/version/3.0", base64);
The watermark text is "@username | yuemutuku.com" — every uploader carries their own identity marker. If an image is stolen later, extracting the blind watermark traces it back to whoever uploaded it. The site's copyright philosophy (every image here follows CC licensing rules) lands in this one line of code.
One more detail: the compression quality is dynamic. getQualityForFileSize tiers it by file size:
public int getQualityForFileSize(long fileSize) {
    if (fileSize < 500 * 1024) return 95;   // under 500KB, high quality
    else if (fileSize < 1024 * 1024) return 92;
    else if (fileSize < 2 * 1024 * 1024) return 90;
    else if (fileSize < 5 * 1024 * 1024) return 85;
    else return 80;                          // 5MB+, moderate quality
}
Why tier by size instead of a fixed quality? Because quality is only the means; size is the goal. A naturally small image keeps high quality to preserve detail; a large image can be squeezed a bit harder in exchange for size, with nearly no visual difference. This function shares the same philosophy as the frontend binary search: talk in terms of size, not quality.
After processing, COS returns an XML, and parseImageProcessResult pulls out width, height, format, size, and the average color. That average color is interesting — it's stored as the "dominant color" in the database, and list pages can use it to tint card backgrounds so the grid looks color-harmonious. The frontend doesn't make an extra request; the data is computed for free at upload time.
 ▲ Fig: The two products in COS after processing — xxx.webp and xxx_thumbnail.webp
Every backend endpoint on this pipeline carries a rate-limit annotation. Taking the credential endpoint as an example:
@BucketRateLimit(key = "picture_upload_token", dimension = RateLimitDimension.USER,
        permitsPerMinute = 30, permitsPerHour = 300, message = "fetching upload credentials too frequently, please try again later")
public BaseResponse<UploadTokenVO> getUploadToken(...)
30 permits per minute, 300 per hour, per user. The confirm endpoint uses the same allowance. Why rate-limit uploads? Because every byte in COS is money — direct upload doesn't cost server bandwidth, but it costs object storage capacity and request count. Without limiting, a single script could build you a warehouse of junk images in ten minutes, and the bill would scare you to death first.
The implementation uses Bucket4j, a Java token-bucket rate limiter. The aspect first lets admins through, then builds the throttle key from "annotation key + dimension," pulls the bucket from Redis, and tryConsume(1) — success proceeds, failure throws "too many requests." The dimension here is USER, so limits are isolated per logged-in user — one user getting throttled doesn't affect anyone else. Switch to the IP dimension (search endpoints use IP), and you isolate by source IP.
The bucket lives in Redis, not local memory — because the backend is deployed as a cluster. With local buckets, each instance throttles independently and the total allowance quietly multiplies by the number of nodes. Redis is what makes "30 per user per minute" actually hold across the whole cluster. The cost is one extra Redis round-trip, which is completely acceptable for low-frequency upload endpoints. That's the fundamental difference between distributed and single-machine rate limiting: single-machine looks at memory, clusters look at shared storage.
More interestingly, this aspect is wired into abuse control: rateLimitService.getThrottleMultiplier(key) returns a "throttle multiplier," and users the system judges high-risk get their limits tightened by multiples. In other words, the rate limit isn't static — it adjusts dynamically with the user's reputation. 30 uploads/minute is the ceiling for a normal user, but in the eyes of abuse control, an abnormal user may only get 5.
The message shown when throttled comes straight from the annotation's message field — once you hit the limit, the frontend pops up "fetching upload credentials too frequently, please try again later."
This pipeline has hit enough potholes since launch to fill a page. A few that left the deepest marks:
Pothole 1: The pre-signed URL only lives 30 seconds — compress too slowly and it expires. At first I asked for the credential before compressing, but a big image takes two-plus seconds to compress; two seconds is fine locally, but on a slow phone it creeps toward five, and by the time you PUT, the URL is long dead — 403. The fix is the current order — compress first, then ask for the credential, leaving the 30 seconds for network transfer instead of local compute.
Pothole 2: The COS SDK's support for blind watermarks v3.0 is incomplete. The code comment says it plainly: "use the REST API directly (the COS SDK's processImage support for blind watermark v3.0 is incomplete)." Both embedding and extraction go through raw HttpURLConnection calls with hand-written signatures, not the SDK wrapper. The most miserable part is the signing — calling REST directly means computing Authorization yourself with COSSigner over "Host + Pic-Operations header + path"; one wrong header and it's a 401. Then you get to deal with SSL compatibility, and we ended up dropping Hutool for raw connections.
Pothole 3: Content-Type has to be right. Direct upload sets Content-Type: image/jpeg or image/webp; this isn't just about correctness — object storage writes that header into the object's metadata, and both CDN caching and browser rendering depend on it. Get it wrong and an image may be downloaded instead of displayed.
Pothole 4: Path prefixes are a historical burden. Once public/, space/, post/ have real data, they become an unchangeable contract — changing a path means migrating the whole database. So think hard about the path rules up front; don't expect to "optimize" them later. The moment that line ships, it's the youngest it will ever be.
Pothole 5: Parsing the image-processing XML. COS's image_process returns XML, and parseImageProcessResult has to dig width, height, and average color out of it. The field names don't fully match the SDK docs; you only find out which one is real after stepping on it. This kind of "vendor-returned format" pitfall has no shortcut — only real-machine verification.
Pothole 6: Don't trust the file name the frontend sends. The cosKey extension comes from the file name's suffix, but the whitelist is validated by the backend's own regex (jpg/jpeg/png/webp plus a few audio formats). Even if the frontend fakes a different suffix, it can't get past this. And the reverse: if you build the storage path purely from a type field the frontend sent, you've handed the keys to the user. This lesson applies to every upload endpoint: any field that affects the storage path or permissions must be validated by the backend.
That's the wall this pipeline has run into — behind every wall is a night of debugging.
Walking the whole pipeline and looking back at its design, it boils down to three sentences:
If you can upload directly, never let the file pass through your server. This is the foundation of the whole pipeline — bandwidth is money, latency is experience, both are life.
If it can be processed in the cloud, never download it back to process locally. WebP conversion, blind watermarking, thumbnails — all of it happens inside COS; your server's CPU never touches a pixel.
Every step has a gate. The frontend compression keeps big files off the wire, the backend validation keeps people from bypassing the frontend, the rate limit keeps scripts from flooding you — three gates, each guarding its own stretch. Miss any one and something breaks.
The frontend binary-search compression, the backend pre-signed PUT, COS's one-rule-does-three-things, Bucket4j's dynamic throttling — taken individually, none of them is high tech. But twisted into one chain, they're a production-grade upload system that doesn't burn bandwidth, doesn't burn CPU, and doesn't fear being flooded.
If you only take three things from this article: first, for large-file uploads always prefer "direct upload to object storage," with the backend only issuing credentials; second, talk to compression in terms of size — quality is just the means, binary search beats guessing; third, anything that can be written as "one rule in the cloud" — transcoding, thumbnails, watermarks — don't download it back to your server. These three save bandwidth, CPU, and ops effort at once, with better value-for-money than any fancy optimization trick.
Next time you write an upload feature, ask yourself first: does this file really need to pass through my server?